Particle 좌표를 사용한 애니메이션 구현
Particle 을 렌더링할 위치값은 BufferGeometry 에 설정합니다.
이번 포스팅에서는 BufferGeometry 의 위치값에 SIN 그래프와 같이 흘러가는 애니메이션을 구현해보겠습니다.
예시 코드
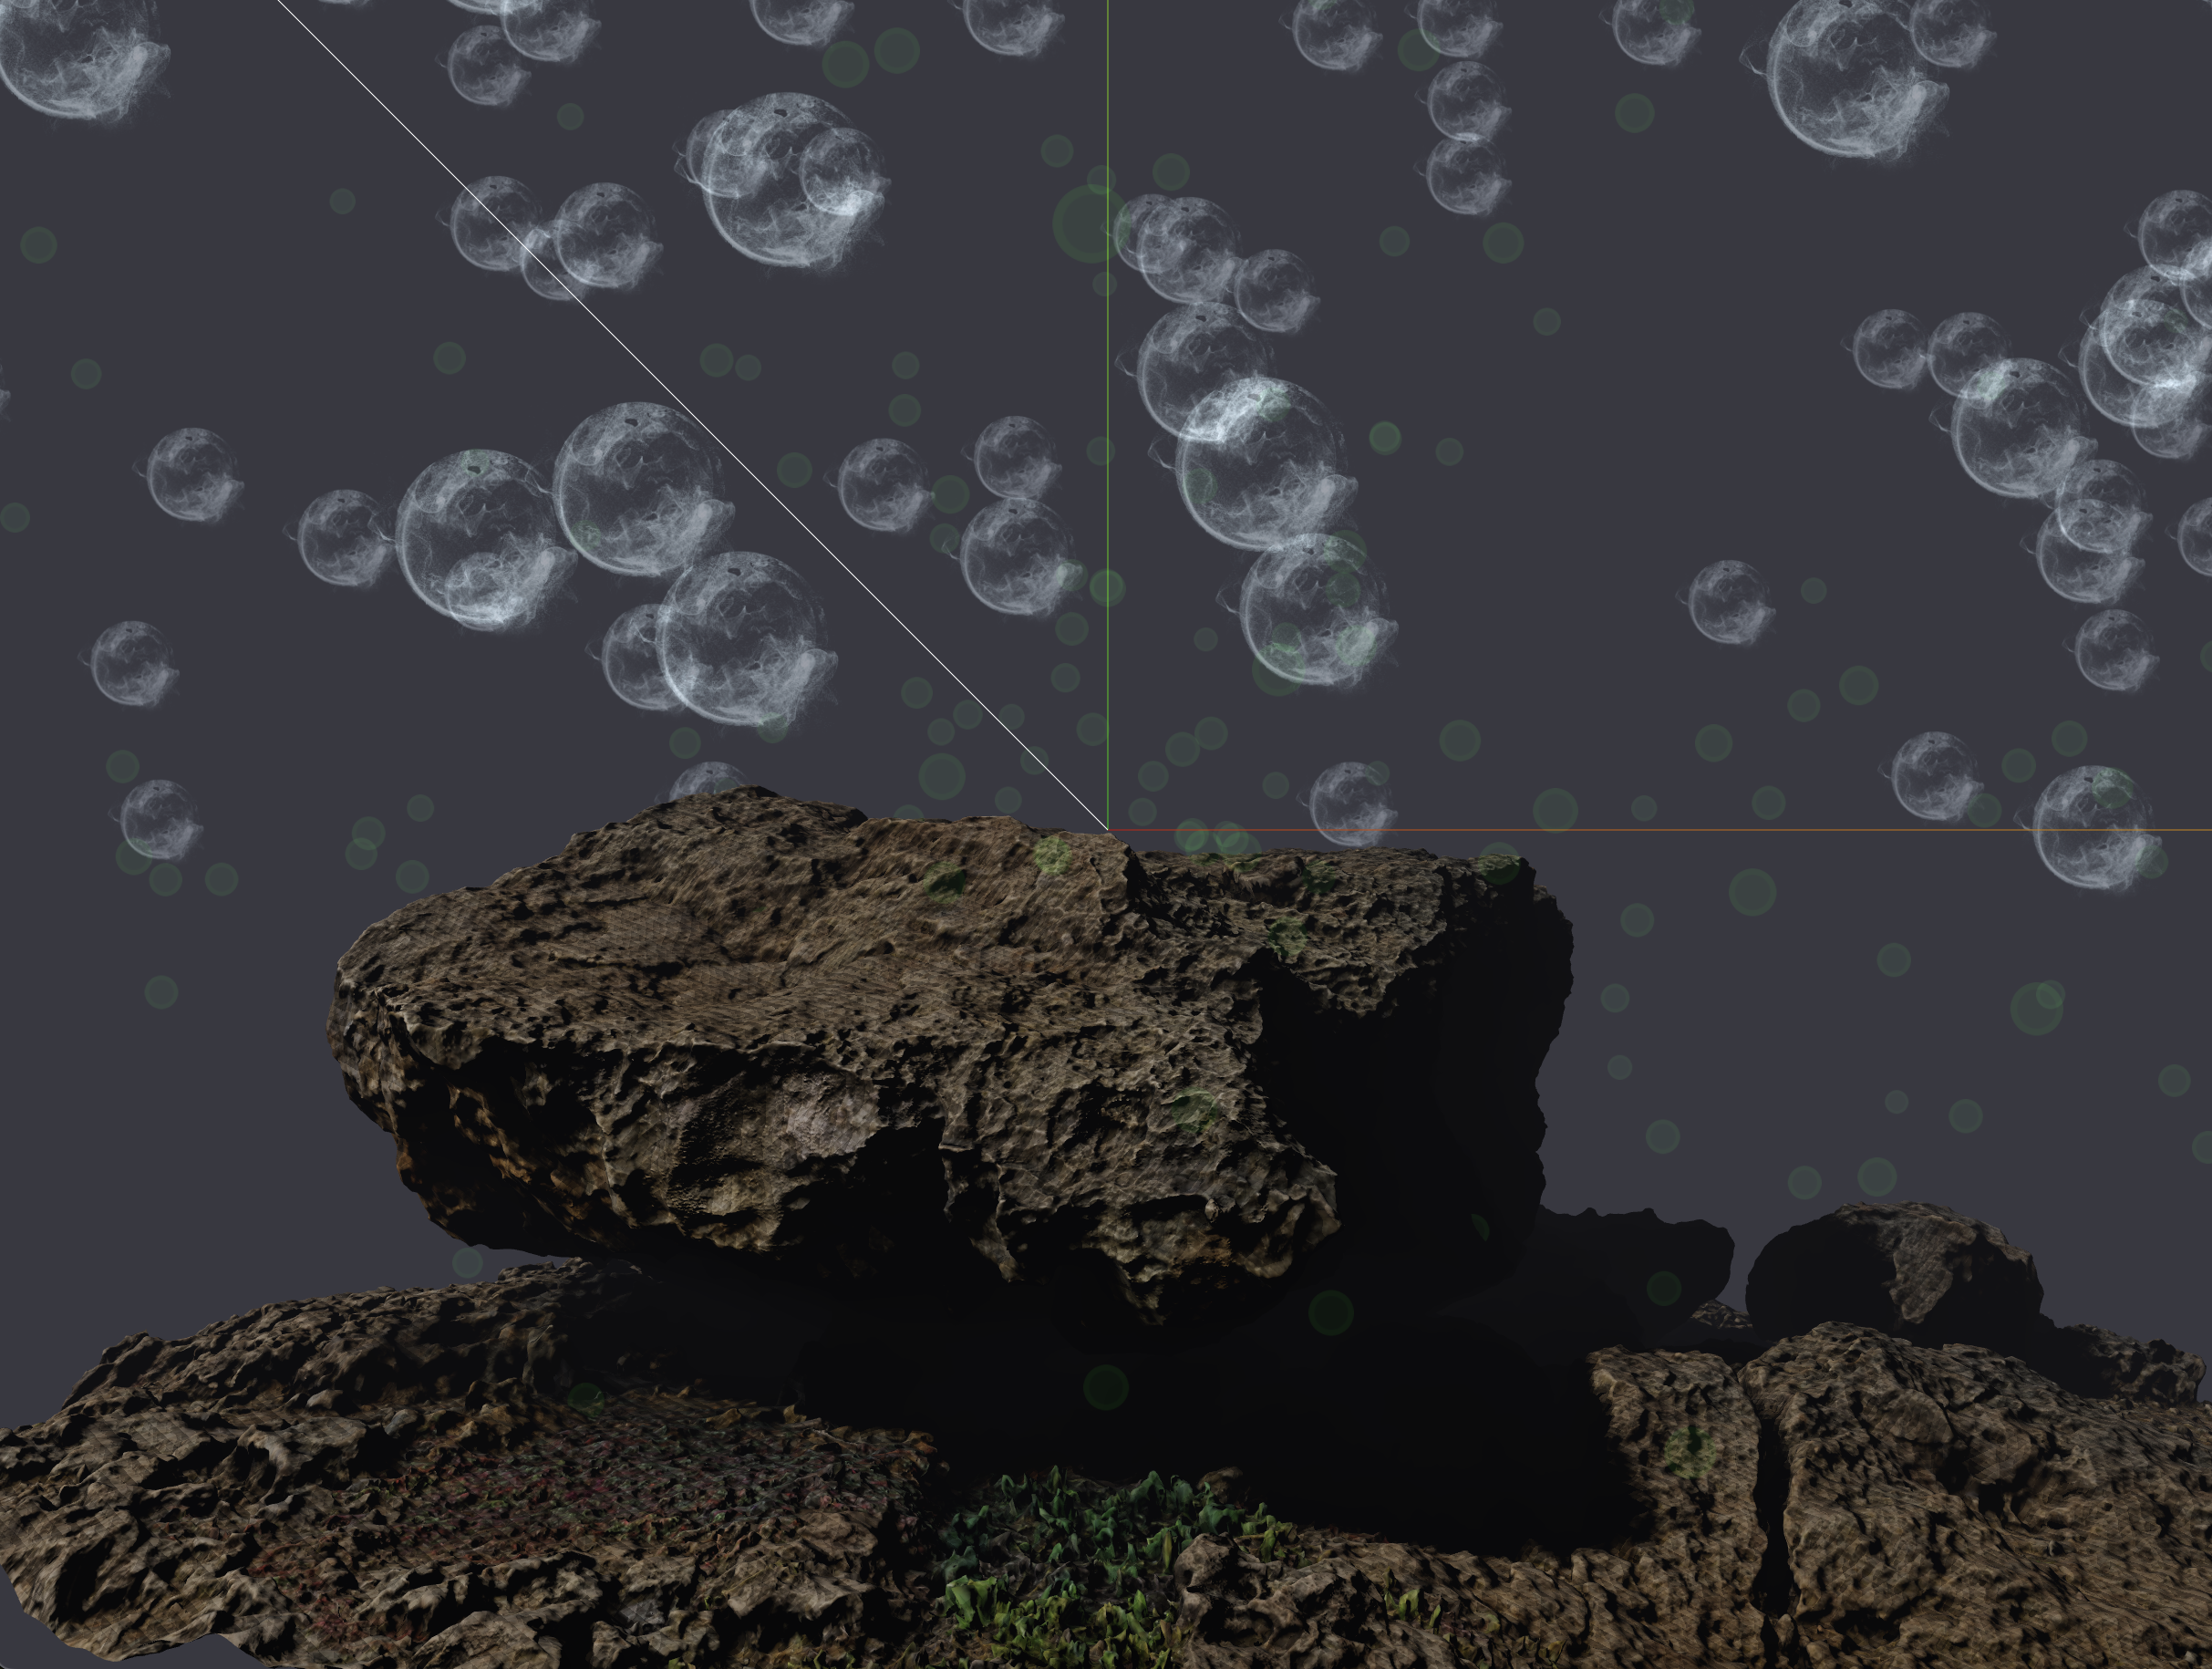
이번 포스팅의 예시 코드는 위 모델과 함께 circleParticle 과 cloudParticle 을 렌더링한 시점입니다.
// three.js
import {
    WebGLRenderer,
    ACESFilmicToneMapping,

    Scene,
    Color,
    Fog,

    PerspectiveCamera,

    AxesHelper,

    DirectionalLight,
    DirectionalLightHelper,

    BufferAttribute,
    BufferGeometry,
    PointsMaterial,
    TextureLoader,
    AdditiveBlending,
    Points,
} from 'three';
// three.js - addons
import {
    OrbitControls,
} from 'three/examples/jsm/controls/OrbitControls';
import {
    GLTFLoader,
} from 'three/examples/jsm/loaders/GLTFLoader';
// style
import './style.css';

//
// state
//
/** @type { WebGLRenderer } */
let renderer;

/** @type { Scene } */
let scene;

/** @type { PerspectiveCamera } */
let camera;

/** @type { OrbitControls } */
let controls;

const circleParticleState = {
    config: {
        NUM_OF_PARTICLES: 250,
    },

    originPosition: null,

    /** @type { Points } */
    particle: null,
};

const cloudParticleState = {
    config: {
        NUM_OF_PARTICLES: 125,
    },

    originPosition: null,

    /** @type { Points } */
    particle: null,
};

//
// core
//
function initCanvas() {
    const $canvas = document.createElement('canvas');

    const $app = document.querySelector('#app');
    $app?.appendChild($canvas);

    return $canvas;
}

function initRenderer($canvas) {
    renderer = new WebGLRenderer({
        canvas: $canvas,
        antialias: true,
    });

    renderer.setPixelRatio(window.devicePixelRatio);
    renderer.setSize(window.innerWidth, window.innerHeight);
    renderer.toneMapping = ACESFilmicToneMapping;
    renderer.shadowMap.enabled = true;
}

function initScene() {
    const color = new Color('#383841');

    scene = new Scene();
    scene.background = color;
    scene.fog = new Fog(
        color,
        0.5,
        15
    );
}

function initCamera() {
    camera = new PerspectiveCamera();

    camera.fov = 30;
    camera.aspect = window.innerWidth / window.innerHeight;

    camera.near = 0.5;
    camera.far = 2000;

    camera.position.set(0, 0, 5);
    camera.lookAt(0, 0, 0);

    camera.updateProjectionMatrix();
}

function initAxesHelper() {
    const helper = new AxesHelper(3);

    scene.add(helper);
}

function initControls($target) {
    controls = new OrbitControls(camera, $target);
    controls.enableDamping = true;
}

//
// light
//
function initDirectionalLight() {
    const color = new Color('#fff');

    const light = new DirectionalLight(
        color,
        Math.PI * 1
    );

    light.position.set(-2, 2, 1);
    light.lookAt(0, 0, 0);
    light.castShadow = true;

    const helper = new DirectionalLightHelper(light);

    scene.add(light);
    scene.add(helper);
}

//
// model
//
function initModel() {
    const loader = new GLTFLoader();

    loader.load('/gltf/coast-rocks-05/coast_rocks_05_4k.gltf', gltf => {
        const model = gltf.scene;
        model.position.set(0, -1, 0);

        model.traverse(child => {
            if (!child.isMesh) {
                return;
            }

            child.castShadow = true;
            child.receiveShadow = true;
        });

        scene.add(model);
    });
}

//
// particle
//
function initCircleParticle() {
    const {
        config: {
            NUM_OF_PARTICLES,
        },
    } = circleParticleState;

    const position = Array.from(
        { length: 3 * NUM_OF_PARTICLES },
        () => {
            return Math.random() * (Math.random() * 2 - 1) * 3;
        }
    );
    circleParticleState.originPosition = position;

    const buffer = new Float32Array(position);
    const positionAttribute = new BufferAttribute(buffer, 3);

    const geometry = new BufferGeometry();
    geometry.setAttribute('position', positionAttribute);

    const material = new PointsMaterial({
        map: new TextureLoader().load('/particle/circle.png'),
        size: 0.2,
        color: new Color('#006400'),
        opacity: 0.2,

        transparent: true,
        blending: AdditiveBlending,
        depthWrite: false,
    });

    const particle = new Points(geometry, material);
    circleParticleState.particle = particle;

    scene.add(particle);
}

function initCloudParticle() {
    const AXIS_MAPPER = {
        X: 0,
        Y: 1,
        Z: 2,
    };

    const {
        config: {
            NUM_OF_PARTICLES,
        },
    } = cloudParticleState;

    const position = Array.from(
        ({ length: 3 * NUM_OF_PARTICLES }),
        (_, i) => {
            const axis = i % 3;
            const randomValue = Math.random();

            switch (axis) {
                case AXIS_MAPPER.X:
                case AXIS_MAPPER.Z:
                    return (randomValue * 2 - 1) * 3;
                case AXIS_MAPPER.Y:
                default:
                    return randomValue * 2;
            }
        }
    );
    cloudParticleState.originPosition = position;

    const buffer = new Float32Array(position);

    const positionAttribute = new BufferAttribute(buffer, 3);

    const geometry = new BufferGeometry();
    geometry.setAttribute('position', positionAttribute);

    const material = new PointsMaterial({
        map: new TextureLoader().load('/particle/cloud3.png'),
        size: 1,
        color: new Color('#fff'),
        opacity: 0.25,

        transparent: true,
        blending: AdditiveBlending,
        depthWrite: false,
    });

    const particle = new Points(geometry, material);
    cloudParticleState.particle = particle;

    scene.add(particle);
}

//
// executor
//
function render() {
    window.requestAnimationFrame(render);

    renderer.render(scene, camera);
    controls?.update();
}

(function init() {
    const $canvas = initCanvas();

    initRenderer($canvas);
    initScene();
    initCamera();
    initAxesHelper();
    initControls($canvas);

    initDirectionalLight();

    initModel();

    initCircleParticle();
    initCloudParticle();

    render();
}());
Particle 회전 애니메이션 구현하기
먼저 Particle 이 회전하는 애니메이션을 구현해 보겠습니다.
Particle 은 Points 객체입니다.
Mesh 객체와 동일한 rotation 속성의 y 축에 값을 변경하여 회전하는 효과를 구현할 수 있습니다.
const circleParticleState = {
    config: {
        NUM_OF_PARTICLES: 250,
        // (Math.PI / 180) * 45: 45도 에 대한 호도법
        // 60: 1초
        // => 1초에 45도 회전
        ROTATION_Y_UNIT: (Math.PI / 180) / 60 * 45,
    },

    originPosition: null,

    /** @type { Points } */
    particle: null,
};

const cloudParticleState = {
    config: {
        NUM_OF_PARTICLES: 125,
        // (Math.PI / 180) * 11.25: 11.25도 에 대한 호도법
        // 60: 1초
        // => 1초에 11.25도 회전
        ROTATION_Y_UNIT: (Math.PI / 180) / 60 * 11.25,
    },

    originPosition: null,

    /** @type { Points } */
    particle: null,
};//
// animation
//
function rotateCircleParticle() {
const {
config: {
ROTATION_Y_UNIT,
},
particle
} = circleParticleState;
particle.rotation.y += ROTATION_Y_UNIT;
}
function rotateCloudParticle() {
const {
config: {
ROTATION_Y_UNIT,
},
particle
} = cloudParticleState;
particle.rotation.y += ROTATION_Y_UNIT;
}
//
// executor
//
function render() {
window.requestAnimationFrame(render);
renderer.render(scene, camera);
controls?.update();
rotateCircleParticle();
rotateCloudParticle();
}render() 함수가 Frame 을 렌더링할 때마다 Particle 의 roation.y 값을 증가시키는 방식으로 회전 애니메이션이 렌더링됩니다.
Particle 의 Y 좌표값에 SIN 함수 적용하기
이번에는 Particle 의 Y 좌표값에 SIN 함수를 적용해 보겠습니다.
결과적으로 Particle 이 흘러가면서 SIN 그래프를 그리는 애니메이션이 구현됩니다.
구현 원리는 다음과 같습니다.
- Y 좌표값의 최초 원본값을 기준값으로 사용합니다.
- 삼각함수 SIN 의 인자로 넘겨줄 radian (각도) 은 시간이 지남에 따라 일정하게 증가시켜줍니다.
- 증가된 radian (각도) 에 의해 SIN 함수의 값을 Y 좌표값에 더해줍니다.
- SIN 함수는 -1 ~ 1 범위의 값을 가지므로, SIN * RADIUS(반지름) 으로 값의 범위를 변경할 수 있습니다.
먼저 Y축 애니메이션을 위한 state 를 추가하겠습니다.
const circleParticleState = {
    config: {
        NUM_OF_PARTICLES: 250,
        // (Math.PI / 180) * 45: 45도 에 대한 호도법
        // 60: 1초
        // => 1초에 45도 회전
        ROTATION_Y_UNIT: (Math.PI / 180) / 60 * 45,

        // 반지름: Y축 범위 절대값
        RADIUS: 0.4,

        // 1프레임에 sin(4) 만큼 Y축 이동
        RADIAN_UNIT: (Math.PI / 180) * 4,
    },

    originPosition: null,
    // 45 도를 초기값으로 설정
    radian: Math.PI / 180 * 45,

    /** @type { Points } */
    particle: null,
};

const cloudParticleState = {
    config: {
        NUM_OF_PARTICLES: 125,
        // (Math.PI / 180) * 11.25: 11.25도 에 대한 호도법
        // 60: 1초
        // => 1초에 11.25도 회전
        ROTATION_Y_UNIT: (Math.PI / 180) / 60 * 11.25,

        // 반지름: Y축 범위 절대값
        RADIUS: 0.2,

        // 1프레임에 sin(1) 만큼 Y축 이동
        RADIAN_UNIT: (Math.PI / 180) * 4,
    },

    originPosition: null,
    // 0도를 초기값으로 설정
    radian: 0,

    /** @type { Points } */
    particle: null,
};
매 프레임을 렌더링할 때, Particle state 의 radian 값을 증가 시키고, SIN(radian) 값을 Particle 의 Y축에 적용하여 애니메이션을 구현할 수 있습니다.
/**
 * @param {typeof circleParticleState} particleState
 */
function animateParticle(particleState) {
    const {
        config: {
            RADIAN_UNIT,
            RADIUS,
            NUM_OF_PARTICLES,
        },

        particle,
        originPosition,
    } = particleState;

    particleState.radian += RADIAN_UNIT;

    Array
        .from({ length: NUM_OF_PARTICLES })
        .forEach((_, i) => {
            const yIndex = i * 3 + 1;
            const originY = originPosition[yIndex];
            const nextY = originY + Math.sin(particleState.radian) * RADIUS;

            particle.geometry.attributes.position.array[yIndex] = nextY;

            // attribute 갱신 여부를 설정해야 렌더링 결과에 반영됩니다. (default: false)
            particle.geometry.attributes.position.needsUpdate = true;
        });
}

//
// executor
//
function render() {
    window.requestAnimationFrame(render);

    renderer.render(scene, camera);
    controls?.update();

    rotateCircleParticle();
    rotateCloudParticle();

    animateParticle(circleParticleState);
    animateParticle(cloudParticleState);
}animateParticle() 함수를 살펴보겠습니다.
337 번줄 에서 radian(각도) 가 매 프레임마다 증가하게 됩니다.
그리고 모든 Particle 의 Y축 좌표값을 갱신해 줍니다.
중요한 점은 BufferGeometry 의 attributes 하위 속성을 변경할 경우, needsUpdate = true 설정을 해주어야만 렌더링 결과에 반영되는 것입니다.
마치며
이번 포스팅에서 정리했던 Particle 은 블로그에 Three.js 를 적용하는 시작점이 될 것 같습니다.
우려되는 부분은 아직 최적화에 대한 지식이 없어서, 버벅거리는 현상을 감수해야 한다는 것입니다.
(Y좌표 연산부를 Iterator 로 구현하면 좀 나아질까요?)
테스트도 겸하는 블로그이므로, 첫번째 Three.js 적용에 도전해보고자 합니다.