click 이벤트에 animation 연동하기
Animation 은 이전 포스팅 Model 에 Animation 효과 적용하기 에서 한번 사용해 보았습니다.
사용자 인터렉션이 아닌, 동영상 링크처럼 자동 재생되는 형식으로 구현했습니다.
이번 포스팅에서는 버튼을 click 했을 때, 해당 버튼의 Animation 만 실행되도록 구현해 보고자 합니다.
예시 코드
예시코드에서 사용한 Model 은 상상력을 자극하는 고퀄리티 3D 인터랙티브 웹 제작 (최인 강사님) 강좌 리소스를 사용하였습니다.
3D Tool 에서 Model 에 Keyframe Animation 을 함께 포함시켰을 때, 이 Animation 을 Three.js 에서 필요한 시점에만 실행시키는 동작을 구현할 예정입니다.
아래 예시 코드는 클릭한 버튼의 color 를 scene 의 배경과 rocket model 에 적용하는 기능까지 구현한 상태 입니다.
// three
import {
    WebGLRenderer,
    Scene,
    PerspectiveCamera,
    ACESFilmicToneMapping,

    Color,
    DirectionalLight,
    HemisphereLight,

    MeshStandardMaterial,

    Vector2,
    Raycaster,
} from 'three';
// three.js - addons
import {
    GLTFLoader,
} from 'three/examples/jsm/loaders/GLTFLoader';
// style
import './style.css';

//
// state
//
/** @type { WebGLRenderer } */
let renderer;

/** @type { Scene } */
let scene;

/** @type { PerspectiveCamera } */
let camera;

//
// core
//
function initCanvas() {
    const $canvas = document.createElement('canvas');

    const $app = document.querySelector('#app');
    $app.appendChild($canvas);

    return $canvas;
}

function initRenderer($canvas) {
    renderer = new WebGLRenderer({
        canvas: $canvas,
        antialias: true,
    });

    renderer.setPixelRatio(window.devicePixelRatio);
    renderer.setSize(window.innerWidth, window.innerHeight);
    renderer.toneMapping = ACESFilmicToneMapping;
    renderer.shadowMap.enabled = true;
}

function initScene() {
    scene = new Scene();
}

function initCamera() {
    camera = new PerspectiveCamera();

    camera.fov = 45;
    camera.aspect = window.innerWidth / window.innerHeight;
    camera.near = 0.5;
    camera.far = 2000;

    camera.position.set(100, 100, 100);
    camera.lookAt(-20, 0, -20);

    camera.updateProjectionMatrix();
}

//
// light
//
function initDirectionalLight() {
    const color = new Color('#fff');

    const light = new DirectionalLight(
        color,
        Math.PI * 1
    );

    light.position.set(-1, 1, 0.5);
    light.lookAt(0, 0, 0);
    light.castShadow = true;

    light.shadow.mapSize.set(1024, 1024);
    light.shadow.camera.near = 0.5;
    light.shadow.camera.far = 500;
    light.shadow.camera.top = 180;
    light.shadow.camera.bottom = -120;
    light.shadow.camera.left = -100;
    light.shadow.camera.right = 100;

    scene.add(light);
}

function initHemisphereLight() {
    const skyColor = new Color('#fff');
    const groundColor = new Color('#555');

    const light = new HemisphereLight(
        skyColor,
        groundColor,
        Math.PI * 0.5
    );

    light.position.set(0, -1, 0);

    scene.add(light);
}

//
// model
//
function initModel() {
    const loader = new GLTFLoader();

    loader.load('/gltf/click.glb', gltf => {
        const model = gltf.scene;

        const ratio = 0.1;
        model.scale.set(ratio, ratio, ratio);
        model.position.set(0, 0, 0);

        model.traverse(child => {
            if (!child.isMesh) {
                return;
            }

            child.castShadow = true;
            child.receiveShadow = true;

            child.material = new MeshStandardMaterial({
                color: child.material.color,
                roughness: 0.3,
            });
        });

        scene.add(model);
    });
}

//
// interaction
//
function initResize() {
    window.addEventListener('resize', () => {
        renderer.setSize(window.innerWidth, window.innerHeight);

        camera.aspect = window.innerWidth / window.innerHeight;
        camera.updateProjectionMatrix();
    });
}

function initClickInteraction($target) {
    const raycaster = new Raycaster();

    $target.addEventListener('click', e => {
        const {
            clientX,
            clientY,
        } = e;

        const mouseCoord = new Vector2(
            (clientX / window.innerWidth) * 2 - 1,
            -(clientY / window.innerHeight) * 2 + 1
        );

        raycaster.setFromCamera(mouseCoord, camera);

        const intersects = raycaster.intersectObjects(scene.children, true);
        const firstModel = intersects[0]?.object;

        if (!firstModel || !firstModel.name.match(/^button.*/)) {
            return;
        }

        const rocketChangingModel = scene.getObjectByName('change');

        const buttonColor = firstModel.material.color;

        rocketChangingModel.material.color = buttonColor;
        scene.background = buttonColor;
    });
}

//
// executor
//
function render() {
    window.requestAnimationFrame(render);

    renderer.render(scene, camera);
}

(function init() {
    const $canvas = initCanvas();

    initRenderer($canvas);
    initScene();
    initCamera();

    initDirectionalLight();
    initHemisphereLight();

    initModel();

    initResize();
    initClickInteraction($canvas);

    render();
}());
AnimationMixer 만들기
Model 에 포함된 Animation 을 실행시키기 위해서는 AnimationMixer 가 필요 합니다.
AnimationMixer 는 애니메이션 플레이어 역할을 합니다.
실행시킬 Animation 을 AnimationMixer 에 등록 시켜주고, render() 함수에서 animationMixer.update(프레임) 으로 다음 장면을 업데이트 해주는 방식으로 동작합니다.
이와 관련한 class 를 살펴보면 다음과 같습니다.
- AnimationMixer: 애니메이션 플레이어 역할을 합니다.
- AnimationClip: 실행할 애니메이션 1개의 정보를 담고 있습니다.
- AnimationAction: AnimationClip 을 재생, 정지, 반복 등의 컨트롤 기능을 제공하는 객체 입니다.
애니메이션을 실행하는데 필요한 작업은 다음과 같은 과정이 필요합니다.
- 애니메이션 대상이 되는 Model 을 사용하여 AnimationMixer 인스턴스를 생성합니다.
- Model 에 포함된
gltf.animations를 AnimationMixer 의clipAction(clip)으로 AnimationAction 으로 만듭니다. - click 이벤트가 발생하면, 원하는 AnimationAction 을 실행시킵니다.
- 프레임마다 실행되는
render()함수 내부에서 AnimationMixer 의update()로 장면을 갱신해줍니다.
// three
import {
    WebGLRenderer,
    Scene,
    PerspectiveCamera,
    ACESFilmicToneMapping,

    Color,
    DirectionalLight,
    HemisphereLight,

    MeshStandardMaterial,

    Vector2,
    Raycaster,

    AnimationMixer,
    AnimationAction,
    LoopOnce,
} from 'three';
// three.js - addons
import {
    GLTFLoader,
} from 'three/examples/jsm/loaders/GLTFLoader';
// style
import './style.css';

//
// state
//
/** @type { WebGLRenderer } */
let renderer;

/** @type { Scene } */
let scene;

/** @type { PerspectiveCamera } */
let camera;

/** @type { AnimationMixer } */
let animationMixer;

/** @type { Record<string, AnimationAction> } */
let animationActions = {};//
// model
//
function initModel() {
const loader = new GLTFLoader();
loader.load('/gltf/click.glb', gltf => {
const model = gltf.scene;
const ratio = 0.1;
model.scale.set(ratio, ratio, ratio);
model.position.set(0, 0, 0);
model.traverse(child => {
if (!child.isMesh) {
return;
}
child.castShadow = true;
child.receiveShadow = true;
child.material = new MeshStandardMaterial({
color: child.material.color,
roughness: 0.3,
});
});
// 1. AnimationMixer 생성하기
animationMixer = new AnimationMixer(model);
// 2. AnimationAction 생성하기
gltf.animations.forEach(clip => {
const animationAction = animationMixer.clipAction(clip);
animationAction.loop = LoopOnce;
animationActions.push(animationAction);
});
scene.add(model);
});
}function initClickInteraction($target) {
const raycaster = new Raycaster();
$target.addEventListener('click', e => {
const {
clientX,
clientY,
} = e;
const mouseCoord = new Vector2(
(clientX / window.innerWidth) * 2 - 1,
-(clientY / window.innerHeight) * 2 + 1
);
raycaster.setFromCamera(mouseCoord, camera);
const intersects = raycaster.intersectObjects(scene.children, true);
const firstModel = intersects[0]?.object;
if (!firstModel || !firstModel.name.match(/^button.*/)) {
return;
}
const rocketChangingModel = scene.getObjectByName('change');
const buttonColor = firstModel.material.color;
rocketChangingModel.material.color = buttonColor;
scene.background = buttonColor;
animationActions.forEach(animationAction => {
animationAction.reset();
animationAction.play();
});
});
}//
// executor
//
function render() {
window.requestAnimationFrame(render);
renderer.render(scene, camera);
animationMixer?.update(1 / 60);
}click 한 버튼만 Animation 실행시키기
버튼을 click 하면 모든 버튼의 Animation 이 플레이 되는 것을 볼 수 있습니다.
현재는 click 이벤트가 발생하면, 모든 AnimationAction 을 play() 하기 때문입니다.
버튼별 Animation 을 적용하기 위해, Model 에 포함된 animations 구조를 파악해야 합니다.
이는 3D Tool 로 구현한 Animations 의 구조에 따라 다르기 때문에, Model animations 의 구조를 파악하고 사용하기 편하게 재구성할 수 있는 능력이 필요합니다.
먼저 Model 의 animations 를 console 에서 확인하면 다음과 같습니다.
//
// model
//
function initModel() {
    const loader = new GLTFLoader();

    loader.load('/gltf/click.glb', gltf => {
        const model = gltf.scene;

        const ratio = 0.1;
        model.scale.set(ratio, ratio, ratio);
        model.position.set(0, 0, 0);

        model.traverse(child => {
            if (!child.isMesh) {
                return;
            }

            child.castShadow = true;
            child.receiveShadow = true;

            child.material = new MeshStandardMaterial({
                color: child.material.color,
                roughness: 0.3,
            });
        });

        // 1. AnimationMixer 생성하기
        animationMixer = new AnimationMixer(model);

        // 2. AnimationAction 생성하기
        gltf.animations.forEach(clip => {
            const animationAction = animationMixer.clipAction(clip);
            animationAction.loop = LoopOnce;

            animationActions.push(animationAction);
        });

        console.log('gltf.animations: ', gltf.animations);

        scene.add(model);
    });
}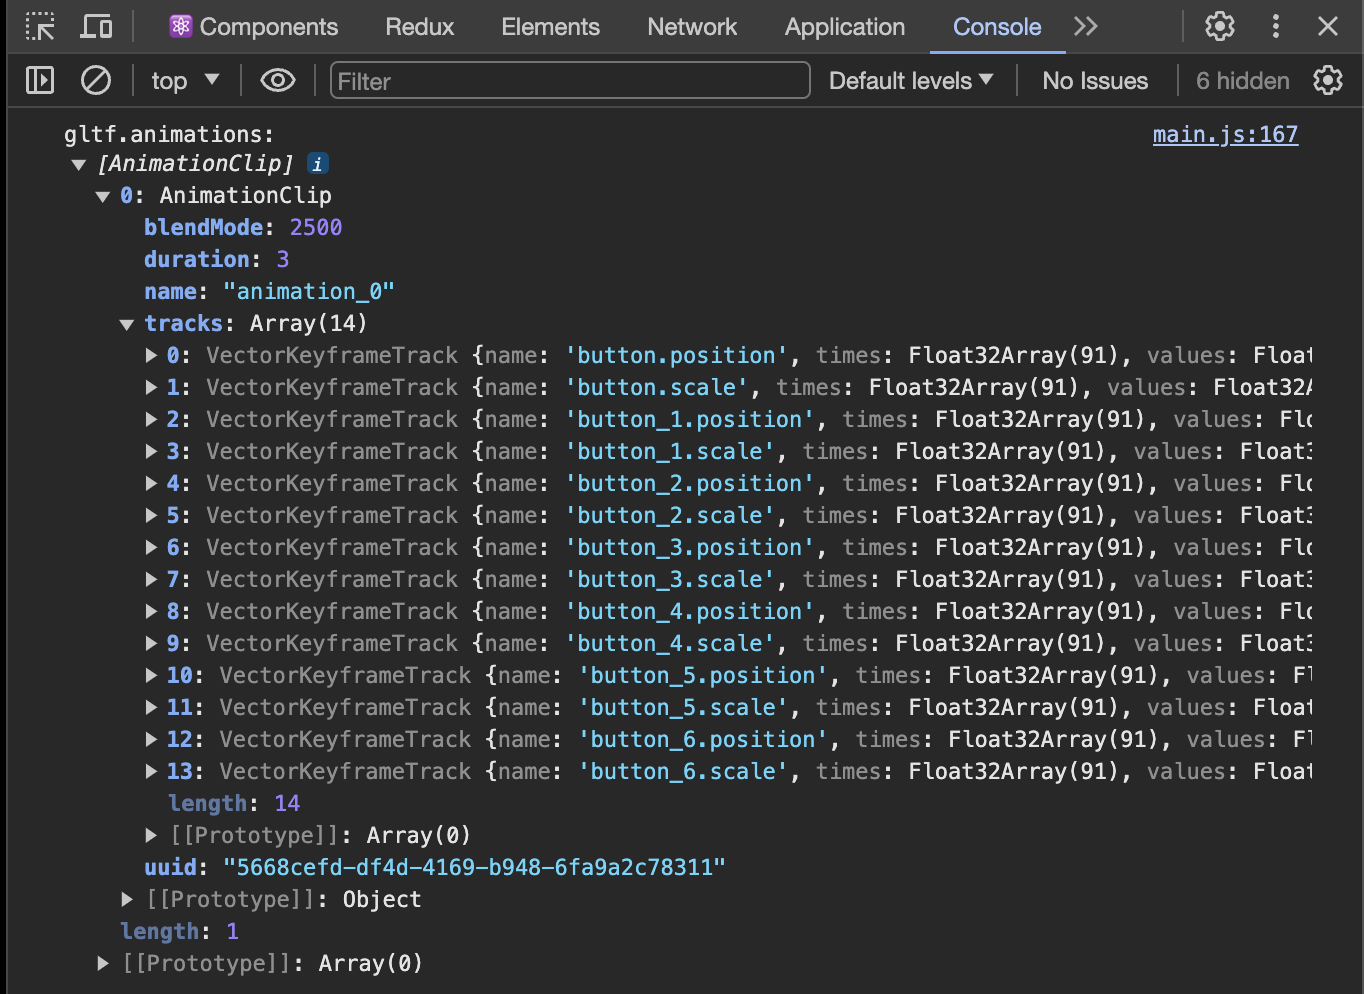
name- AnimationClip 의 이름입니다.
animation_0이라는 이름이라서, 버튼별 식별자로 사용할 수는 없어 보입니다.
tracks- AnimationClip 을 이루는 최소 단위 Animation 의 리스트입니다.
- 하나의 Animation 에서 회전, 위치 등이 동시에 변형될 수도 있는데, 이를 VectorKeyframeTrack 인스턴스로 표현합니다.
console에서 확인하면, 각 track 의 name 으로 특정 버튼을 식별 할 수 있을 것 같습니다.button.position,button.scalebutton_1.position,button_1.scalebutton_2.position,button_2.scalebutton_3.position,button_3.scalebutton_4.position,button_4.scalebutton_5.position,button_5.scalebutton_6.position,button_6.scale
click 이벤트가 발생하면 Raycaster 의 intersectObjects() 로 대상 Model 을 참조할 수 있었습니다.
그리고 아래와 같이 대상 Model 의 name 을 참조할 수 있습니다.
const intersects = raycaster.intersectObjects(scene.children, true);

const targetModel = intersects[0].object;

const targetModelName = targetModel.name;
대상 Model 의 name 과 VectorKeyframeTract 의 name 의 관계를 찾아보면 다음과 같습니다.
if (targetModelName === track.name.split('.')[0]) {
    // targetModel 에 대한 track 식별 성공
}
지금까지 파악한 Model 의 animations 를 요약하면 다음과 같습니다.
- 단일 AnimationClip 이 존재합니다.
- 모든 버튼의 VectorKeyframeTrack 이 단일 AnimationClip 에 묶여있습니다.
묶여있는 VectorKeyframeTrack 을 각 버튼별 AnimationClip 으로 재구성해야 버튼별 Animation 을 개별로 플레이 할 수 있습니다.
단일 AnimationClip 을 버튼별 AnimationClip 으로 재구성하면 다음과 같습니다.
/** @type { Record<string, AnimationAction> } */
let animationActionMapper = {};//
// model
//
function initModel() {
const loader = new GLTFLoader();
loader.load('/gltf/click.glb', gltf => {
const model = gltf.scene;
const ratio = 0.1;
model.scale.set(ratio, ratio, ratio);
model.position.set(0, 0, 0);
model.traverse(child => {
if (!child.isMesh) {
return;
}
child.castShadow = true;
child.receiveShadow = true;
child.material = new MeshStandardMaterial({
color: child.material.color,
roughness: 0.3,
});
});
// 1. AnimationMixer 생성하기
animationMixer = new AnimationMixer(model);
// 2. AnimationAction 생성하기
// gltf.animations.forEach(clip => {
// const animationAction = animationMixer.clipAction(clip);
// animationAction.loop = LoopOnce;
// animationActions.push(animationAction);
// });
/** @type { Record<string, AnimationClip> } */
const animationClipMapper = {};
gltf.animations[0].tracks.forEach(track => {
const name = track.name.split('.')[0];
const targetClip = animationClipMapper[name];
if (targetClip) {
targetClip.tracks.push(track);
} else {
const newClip = new AnimationClip(name, -1, [
track,
]);
animationClipMapper[name] = newClip;
}
});
Object
.entries(animationClipMapper)
.forEach(([name, clip]) => {
const clipAction = animationMixer.clipAction(clip);
clipAction.loop = LoopOnce;
animationActionMapper[name] = clipAction;
});
scene.add(model);
});
}function initClickInteraction($target) {
const raycaster = new Raycaster();
$target.addEventListener('click', e => {
const {
clientX,
clientY,
} = e;
const mouseCoord = new Vector2(
(clientX / window.innerWidth) * 2 - 1,
-(clientY / window.innerHeight) * 2 + 1
);
raycaster.setFromCamera(mouseCoord, camera);
const intersects = raycaster.intersectObjects(scene.children, true);
const firstModel = intersects[0]?.object;
if (!firstModel || !firstModel.name.match(/^button.*/)) {
return;
}
const rocketChangingModel = scene.getObjectByName('change');
const buttonColor = firstModel.material.color;
rocketChangingModel.material.color = buttonColor;
scene.background = buttonColor;
// animationActions.forEach(animationAction => {
// animationAction.reset();
// animationAction.play();
// });
const targetAnimationAction = animationActionMapper[firstModel.name];
targetAnimationAction?.reset();
targetAnimationAction?.play();
});
}